SARK V5.0.0 Debian install
SARK 5.0.0 Debian Install
V5 can be installed onto either wheezy or jessie 32 bit or 64 bit.
Before you begin
Upgrading from a previous release
- V5 uses HTTPS so you must ensure the firewall has a rule for HTTPS (TCP 443) before you begin otherwise you will lock yourself out and you will need to manually add a rule using SSH or a glass screen attached to the server.
New install
- V5 is designed to run as an appliance, it must not be installed onto a multi purpose system that has been used for other tasks. If you try you will likely break both the existing systems and SARK. You must begin with a Debian minimal install which contains nothing but an SSH server.
Installation
Proceed as follows;
Log in to the linux console on your box and run one of the following depending upon whether you have wheezy or jessie installed
EITHER (wheezy)
echo deb http://sailpbx.com/sail/sail-5.0/debs/repo/ wheezy main >> /etc/apt/sources.list
apt-get update
OR (jessie)
echo deb http://sailpbx.com/sail/sail-5.0/debs/repo/ jessie main >> /etc/apt/sources.list
apt-get update
Installing a Mail agent
If this is a new install, you should install a mail agent. SARK has on-board support for a lightweight mail agent called ssmtp. If you install it then sark will provide a tab in the networking section for you to configure it. Install it now (so that SARK can set the correct perms) with...
apt-get install ssmtp
There is a setup guide for Asterisk vmail to email HERE
Installing SARK/SAIL
apt-get install sail
The install will take a good few minutes depending upon the speed of the donor box and your internet link. During the install you will be asked to enter root passwords for both MySQL and LDAP (make a note of them, you'll need them later). You will also be asked to enter the international dial code (IDD) for your country. For example, if you are in the UK, this would be 44.
Let the install run to its conclusion.
Seed the CDR database
Now you can seed the Asterisk MySQL CDR database with the following command (substitute the MySQL root password you gave during the sail installation).
mysql -u root --password={your mysql root password} < /opt/sark/stat/asterisk-stat-v2/cdr-mysql-setup.sql
Install Asterisk extra sounds package
SAIL requires the Asterisk extra sounds package. If you want UK English, there is a deb on the repo
apt-get install ast-en-gb-gpl-gsm-sounds
If you want "Alison" (US American), there is no deb available for this but it's pretty easy to install. At the linux CLI do the following
cd /usr/share/asterisk/sounds
wget http://downloads.asterisk.org/pub/telephony/sounds/asterisk-extra-sounds-en-gsm-current.tar.gz
tar xvfz asterisk-extra-sounds-en-gsm-current.tar.gz
rm asterisk-extra-sounds-en-gsm-current.tar.gz
Clean up
You're done - reboot it
reboot
your sail app will be at https://your.server.ip.address
- UID - admin
- PWD - sarkadmin
Close your browser and re-open it if you were previously running an earlier version of sail. If you don't, you'll get odd looking output as the cached jquery code fights with the new 4.1 output.
OK, you're done; unless of course you'd like to run the new ldap directory feature in 4.1, in which case read on...
LDAP install
Assuming LDAP is not already installed on your SARK/SAIL box, proceed as follows;
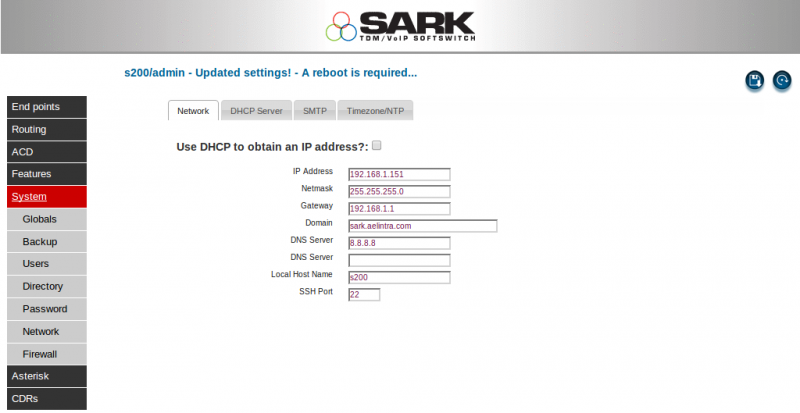
Open the SARK browser app and navigate to the network panel. Turn OFF the checkbox "Use DHCP to obtain an IP address?:" and enter a domain name into the domain name field. You can also allocate a fixed IP address and DNS information at this point if you wish but you MUST enter a domain name. Doesn't matter what domain you choose, as long as it follows the rules for correct domain name formation. This is necessary because the Debian LDAP installer will use this name to create the LDAP Base dn. If you DON'T do this then you'll end up needing to reconfigure ldap after the install and it will get messy so don't say we didn't warn you.
In our example we've used a domain of sark.aelintra.com
OK, save the information you've entered and reboot your box.
Now you can install ldap
apt-get install slapd ldap-utils
The installer will ask you to provide an admin password for LDAP, make a note of it; you'll need it shortly and whenever you want to do any other stuff with ldap in the future.
Once it's installed you need to add an organizationalUnit(ou) for your address book. If you are already a whiz with ldap then just go ahead and do it, using a base dn the same as your domain name. If you don't know ldap then proceed as follows...
You will find a file on your SARK box at /opt/sark/cache/ldapcontactou.ldif
dn: ou=contacts,dc=sark,dc=aelintra,dc=com
objectClass: organizationalUnit
objectClass: top
ou: contacts
Without getting into the details (you can read about ldap elsewhere), in the first line of the file is the name of the organizationalUnit we want to create. In our example it is "contacts", if you are unfamiliar with ldap, then leave it as that. The remainder of the line (dc=sark,dc=aelintra,dc=com) is called the base dn. Debian builds the base dn automatically from the domain you provided earlier so you must make yours match your domain name. If, for example, you used a domain name of splodge.soap.com then you should make your file look like this
dn: ou=contacts,dc=splodge,dc=soap,dc=com
objectClass: organizationalUnit
objectClass: top
ou: contacts
Ok, lets add it, we are going to use the LDAP slapadd utility, which is old fashioned nowadays, but easy to use.
/etc/init.d/slapd stop
slapadd -l /opt/sark/cache/ldapcontactou.ldif
/etc/init.d/slapd start
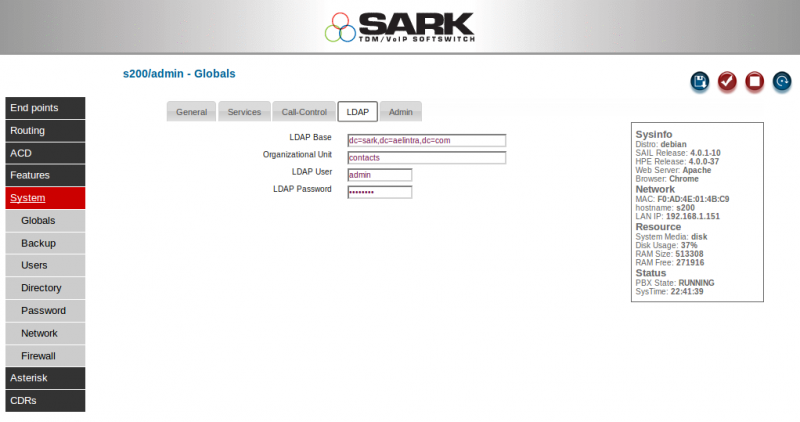
Almost done. Navigate to the SARK browser app and open the Globals page. You will see a new tab called LDAP. Click on it and enter the details for your LDAP database. You'll need the password you provided when you installed LDAP.
Issue a commit and you're done.
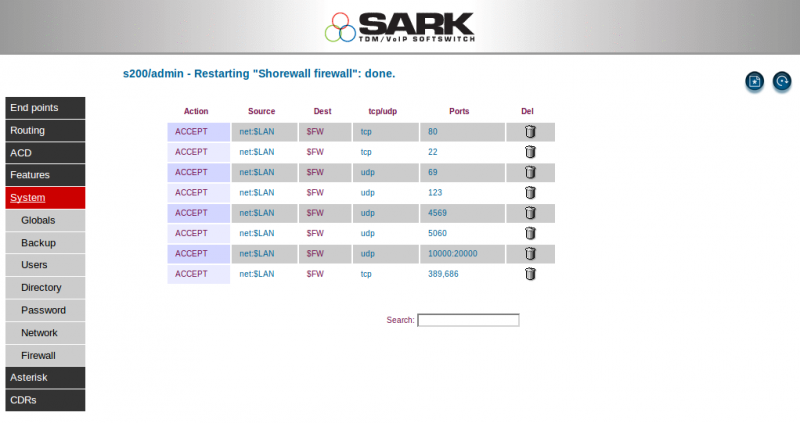
Refresh your browser and navigate to SARK. You should see a "Directory" option when you click on the "System" drop-down. In this page you can add and modify your telephone book entries and have your phones browse them. You'll need to add a couple of entries to your SARK firewall for TCP ports 389 and 686 (restrict them to net:$LAN) to allow the phones to query the database. Here's how we've added ours (see the last line) - don't forget to restart the firewall.
Set up your phones to use LDAP
Most major SIP Phone types can use LDAP however, the implementation varies from type to type.
Snom and Yealink both support LDAP and both have on-board provisioning already set-up for openLDAP on SARK.
Cisco small business phones (SPA) support LDAP and Provu have a section on their website showing how to set them up http://blog.provu.co.uk/item/234
Polycom phone set-up is more complex (isn't it always?), however there is good documentation provided by Polycom so you should be able to get it running with a little work although we don't show it here.
Aastra's do not natively support LDAP. However, it is possible to program it in using their XML capabilities and a php server stub. There is documentation elsewhere on the web detailing how to do it.
Panasonic phones do not currently have LDAP directory support.
Gigaset professional (N series) phones support LDAP and there is documentation on their website


