SARK Debian Accidental Lockouts
SARK accidental lockouts and how to deal with them
SARK has both strong security and a powerful on-board firewall. It is possible to lock yourself out of the system in a couple of ways, either because you have mis-set the firewall or because you have lost or forgotten the admin password. Here is a guide to unlocking the system if you should find yourself in one of these situations. In all but the first scenario, you will need the physical SARK box in your possession to do the fix.
Firewall Lockouts
You've set the firewall in such a way that it will no longer allow you access on HTTPS and/or SSH
SARK keeps its firewall rules in /etc/shorewall/sark_rules. The raw file looks like this in its default state
ACCEPT net:$LAN $FW tcp 5060 - - # TCP SIP
ACCEPT net:$LAN $FW tcp 5061 - - # TCP SIPTLS
ACCEPT net:$LAN $FW tcp 80 - - # HTTP
ACCEPT net:$LAN $FW tcp 443 - - # HTTPS
ACCEPT net:$LAN $FW tcp 22 - - # SSH
ACCEPT net:$LAN $FW udp 123 - - # NTP
ACCEPT net:$LAN $FW tcp 389 - - # LDAP
ACCEPT net:$LAN $FW udp 389 - - # LDAP
ACCEPT net:$LAN $FW udp 4569 - -  # IAX2
ACCEPT net:$LAN $FW udp 5060 - - # SIP
ACCEPT net:$LAN $FW udp 10000:20000 - - # RTP
HTTPS lockout (SSH is still available)
This is the easiest lockout to repair. Connect to the box using native ssh if you are using a Linux box for access. On Windows you can use PuTTY or WinSCP if you prefer. You will find the SARK shorewall firewall rules in the file:- /etc/shorewall/sark_rules.
Correct the rules and either reboot the box or, if you are using ssh or PuTTY, simply restart the firewall with the following command:-
shorewall restart
HTTPS AND SSH lockout
This is a more difficult scenario because you cannot get to the box remotely at all. You will either need to attach a screen and keyboard to the SARK box or, in the case of embedded systems, remove the SD Card and attach it to another computer. You can use a simple USB SD Card device to do this. The procedure for accessing the data is different depending upon whether you have attached your SARK SD Card to a Linux machine or a Windows machine.
Directly attached screen and keyboard
Login as root and use whichever text editor you are most familiar with to repair the firewall sark_rules file shown above. All systems will have the vim and pico editors pre-installed. You can of course install your own favourite editor using apt-get if you are familiar with the Debian package manager.
SD Card Linux procedure
Depending upon your Linux distro you may find the external SD Card device will automount on your box, in which case you can just modify the firewall rules without further ado. If it doesn't automount, then you can use dmesg to see which device linux has allocated to it and mount the device manually.
dmesg
.
.
.
[18728740.570834] usb-storage 2-1.5:1.0: USB Mass Storage device detected
[18728740.571011] scsi host39: usb-storage 2-1.5:1.0
[18728741.568149] scsi 39:0:0:0: Direct-Access     Generic  STORAGE DEVICE   0819 PQ: 0 ANSI: 6
[18728741.568481] sd 39:0:0:0: Attached scsi generic sg3 type 0
[18728741.711336] sd 39:0:0:0: [sde] 8011776 512-byte logical blocks: (4.10 GB/3.82 GiB)
[18728741.712470] sd 39:0:0:0: [sde] Write Protect is off
[18728741.712472] sd 39:0:0:0: [sde] Mode Sense: 23 00 00 00
[18728741.713592] sd 39:0:0:0: [sde] Write cache: disabled, read cache: enabled, doesn't support DPO or FUA
[18728741.719012]  sde: sde1 sde2
[18728741.722769] sd 39:0:0:0: [sde] Attached SCSI removable disk
[18728742.010920] usb 2-1.5: reset high-speed USB device number 53 using ehci-pci
In the example above, we can see that Linux has allocate /dev/sde to the attached drive. We want the second partition (the rootfs) so we will mount sde2.
mount /dev/sde2 /media/image
ls /media/image/
bin   dev  home  lost+found  mnt  proc	run   selinux  sys	 tmp  var
boot  etc  lib	 media	     opt  root	sbin  srv      tftpboot  usr
...and now we can go ahead and make the changes to the firewall as we did in the first example. Once saved, reinstall the drive into the SARK box and reboot it.
SD Card Windows procedure
We used Windows 10 to test this procedure but it's likely any modern Windows release should be OK. Out of the box, Windows cannot read a Linux filesystem. However, there is a free tool for Windows which does it pretty well. It is called ext2fsd. You can download it from http://www.ext2fsd.com/?page_id=2. We make no representation for this tool and cannot guarantee its fitness for purpose except insofar as to say it worked for us.
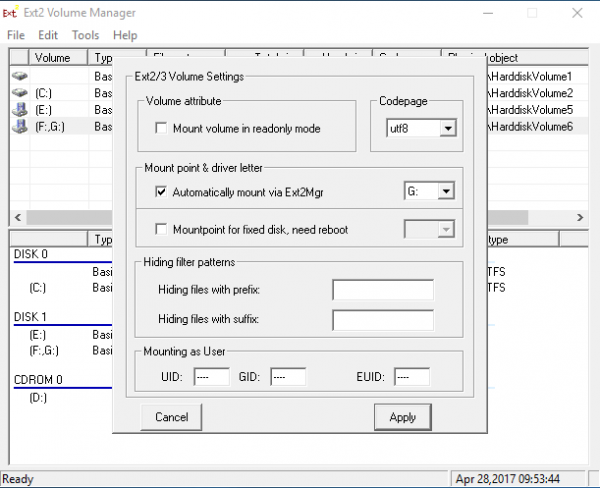
Download ext2fsd and install it. Plug up your external drive and start ex2fsd. You will see a screen like this
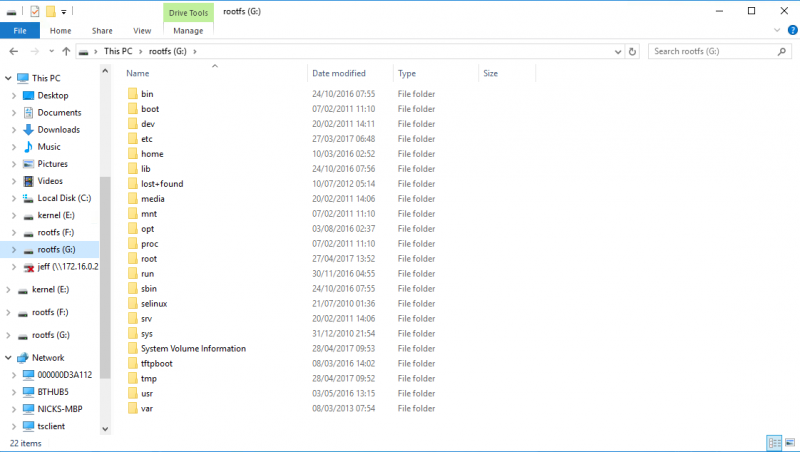
Press Apply and ex2fsd will automatically map the linux partitions to your drives and allow you to navigate the Linux system
Now you can open the firewall rules file and make your changes. You may find that notepad does not open the file properly and you need to use wordpad or some other text editor.
Password Lockouts
For whatever reason, you do not have the admin password.
Password lockouts require a different procedure but it is broadly similar to the 'complete firewall lockout' above. In all cases, the disk has to be removed and mounted onto another computer. SARK passwords are one-way encrypted, they cannot be recovered. However, the database can be reset to the factory default password of 'sarkadmin'. To do this we need to delete and re-create the admin user record in the database. SARK uses the popular SQLite3 database to store its metadata. Therefore, you will need a method of accessing SQLite3 databases. As you might expect, the method is different depending upon whether you are using a Linux or Windows box to do the repair.
Linux procedure
There is a good chance your Linux distro will already have SQLite3 installed. If it doesn't then you will need to install it using yum or apt-get depending upon your flavour of Linux. Once that's done you can use the Linux CLI to change the SQLite3 database.
Fire up SQLite3 with the SARK db as its target. Let's assume the SARK rootfs is mounted on /media/usbdrive on your Linux box.
sqlite3 /media/usbdrive/opt/sark/db/sark.db
Now, run the following commands at the SQLite3 prompt
DELETE FROM user WHERE pkey='admin';
INSERT INTO User(id,pkey,email,password,salt) values ('1','admin','admin@yourco.com','f9d00b85a314b0ea492159a475a8e9301c9ac579759043ba902f445eb629ad6e','4b78f15c5dbaf8ac');
.exit
That's it. You can unmount the SARK disk, re-install it and power up. When you login, use the default password of 'sarkadmin'. SARK's browser will force you to change the password in the normal way and you will be back on the road.
Windows procedure
The Windows procedure is the same as the Linux procedure but you will need both ex2fsd (see above) and an SQLite3 GUI. There are several available but the one we used for this guide is called 'DB browser for SQLite'. You can get it from here http://sqlitebrowser.org/. It is open source and free. Again, we make no representation for it other than to say it works for us.
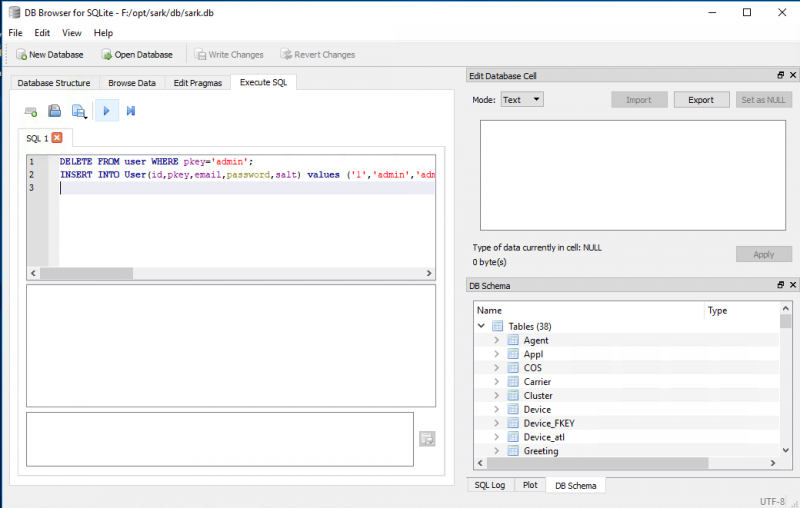
Connect your SARK drive to the Windows box and start ex2fsd. Now start the SQLite browser and use the file tab to open the SARK DB which will be at \opt\sark\db\sark on the SARK rootfs drive.
Select the ExecuteSQL tab and enter the SQL below (see screenshot)
DELETE FROM user WHERE pkey='admin';
INSERT INTO User(id,pkey,email,password,salt) values ('1','admin','admin@yourco.com','f9d00b85a314b0ea492159a475a8e9301c9ac579759043ba902f445eb629ad6e','4b78f15c5dbaf8ac');
Now, click the 'Play" button to execute the SQL. Save the file, safely unmount (detach) the drive and you're done. You can re-install the media into the SARK box and power it up. When you login, use the default password of 'sarkadmin'. SARK's browser will force you to change the password in the normal way and you will be back on the road.


